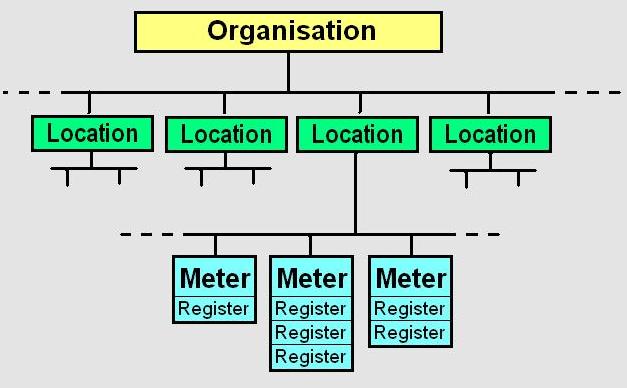
In a MeterPad scheme, there will be one person designated to represent the organisation and act as 'scheme owner'. He or she has authority to define locations, meters, and registers, and also to nominate 'users'.
A general user is allowed to
You can leave a comment against any reading you take. This is useful if, for example, a meter has gone round the clock,
or been exchanged. An administrator can edit the record based on your comments.
You will be asked to select first the location of the meters in question. If you are a general user,
there may be only one choice, depending on the permissions that have been set for you.
After selecting the location you must choose which sequence you would like
to read the meters in (view help on sequence lists).
You will then see an input form for the first reading in the sequence. Points to note:
You will be asked to select first the location of the meters in question. If you are a general user,
there may be only one choice, depending on the permissions that have been set for you.
After selecting the location you must choose which sequence you would like
to enter the meters in (view help on sequence lists).
You will then see an input form for all the meters in your selected list. Points to note:
You will be asked to select first the location of the meter in question. If you are a general user,
there may be only one choice, depending on the permissions that have been set for you.
Next you will be invited to select a meter at that location.
A data-entry form for that meter will appear. Points to note:
You will be asked to select first the location of the meters that you wish to organize.
If you are a general user,
there may be only one choice, depending on the permissions that have been set for you.
After selecting the location you must choose which existing sequence list you would like to edit
(if there are any), or select the Define new walk-list option.
Points to note:
The setup screen contains two lists: Available meters and Selected meters. To
add a meter to the 'selected' list, highlight it in the 'available' list and use the
Add-> button. Use the <-Remove button to take a highlighted meter out of
the 'selected' list, or the Move up or Move down buttons to change its
position in the sequence.
Click the Save list button to store your list for future use.
To remove an existing list from the system, retrieve it and click the Delete button.
Points to note:
Taking readings direct from meters
After logging in, go to the Input tab and select the option 'Take readings direct from meters'.
When you reach the end of the sequence, you will be returned to the start. Click Exit or log out.
Transcribing a batch of readings taken earlier
After logging in, go to the Input tab and select the option 'Enter a batch of readings taken earlier'
Transcribing readings from an individual meter
After logging in, go to the Input tab and select the option 'Enter a reading for one meter'
Controlling the sequence of meter readings
After logging in, go to the Management tab and then select the Lists tab.
If you are creating a new sequence list, you must give it a Description (for example,
"Caretaker's round" or "Month-end routine") that will enable you to recognise it among
other available lists.
Editing your personal profile
After logging in, go to the My profile tab.
Click Store to commit any changes to the database.
Logging out
MeterPad can remember your login credentials to make it easy to get back in and resume work
after logging out. There are three options: